
Creating PowerPoint Templates with the Slide Master View
- admeurotrucksimula
- Jun 6, 2016
- 8 min read
Using PowerPoint in the classroom can be extremely helpful, but from personal experience, finding the time to produce presentations can be difficult. Creating your own custom templates can be a huge time saver!
Anything that can save me time can only be a good thing. I try to keep a healthy balance between my work and my home life. Recently that has meant trying to find some time every day to not work and just relax.
I remembering expressing a similar sentiment when I wrote an article called 10 more PowerPoint tips for teachers. An article where I tried to put together a list of tips and tricks that were easy to use and that I have found helpful.
Sandy Millin left me a comment talking about one of the features that she has found incredibly useful.
One of the features I think is incredibly useful and too few people know about is the Slide Master, and the fact that you can save your own templates to reopen every time you want to create a new presentation with logos/formatting/particular layouts etc.
Before Sandy left me this comment, I hadn’t thought about writing a new article about the Slide Master View. I realised though it is something I should have added to my article because it has saved me so much time and it has kept my presentations consistent.
Before you switch off, my presentations are not bullet points and too much text. Everyone has their own style of presentation and mine has developed over the years because of ideas that I have explored and the suggestions of colleagues that I took on board. These days my presentations include the target language input, visual instruction, conversation prompts & instructional icons, as well as a variety of activities.
That’s just become my style. And because I have developed a style, I created a template to make it faster and easier to produce my presentations.
This article is a quick guide to the Slide Master View and how to create your own custom templates.
PowerPoint Templates
When you open PowerPoint you are offered the choice to open a Blank Presentation, where you can design your own presentation, or you can open a premade template.
I prefer to open a Blank Presentation if I am producing a one-off presentation. If I am teaching a course or giving a presentation that requires a consistent style, I will produce my own template.
The reason being is that your audience is probably familiar with the default templates and may associate them with bad presentations that have seen in the past.
But a Blank Presentation is still a template. It’s just the default blank template that contains the same number of slide layouts but you have the freedom to design your own presentation.
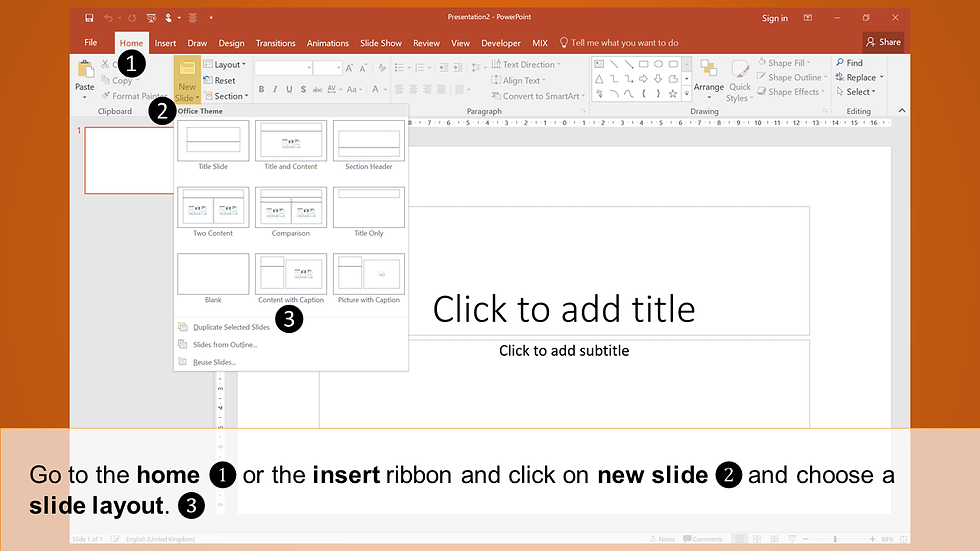
Go to the home ribbon or the insert ribbon.
Click on new slide.
Choose a slide layout.
The slide layouts available in a blank presentation are all fairly standard and probably won’t include the features that you want or need. In this case, you will need to create your own PowerPoint template.
Creating Your Own Template
Creating your own PowerPoint template isn’t difficult because you are using the majority of the same features that you would use to build a normal presentation. The only big difference is that you are working in a different area of PowerPoint. You are working in the slide master view.

To open the Slide Master View:
Go to the View Ribbon
Click on the Slide Master Icon
The Slide Master view will open. The next thing you will need to do is to choose the features that you want displayed on your slide master.
Choosing Your Features
When the Slide Master View opens, you will see a new ribbon called Slide Master. While you will use the other ribbon when designing your template, this ribbon allows you edit your Slide Masters, rename them, add layouts and hide features.

Select a Slide Master (This is the largest slide at the top).
Click on Master Layout.
The Master Layout options will appear.
Check / Uncheck the features that you want and click OK.
Title, Text, Date, Slide Number and Footer are all features that you can decide not to display. These features aren’t shown by default and they can be switched on or off during in the edit mode when you are working with your template. Unchecking features means that the person uses your template will not have these features available to them at all.
You can also uncheck the header and footer for individual layouts.
Select a Layout
Go to the Slide Master Ribbon
Check / Uncheck Header and Footer
Now you have decided what features your Master Layout will have, you can begin to edit your template.
Editing Your Template

Before you start editing your slide master, I recommend that you insert a second slide master.
You may have noticed that when you insert a new slide in a blank presentation you will see a list of nine layouts under the title of Office Theme. Those layouts represent one slide master. A second slide master will keep all your new layouts in a different section while allowing you to keep your standard layouts.
Go to the Slide Master ribbon and click on Insert Slide Master.
A second Slide Master will appear in the slide pane.
If you edit the 1st Slide Master, your custom layouts will appear under the 1st section in the new slide drop-down menu (Office Theme).
If you edit the 2nd Slide Master, your custom layouts will appear under the 2nd section in the new slide drop-down menu (Custom Design).
I usually edit the 1st Slide Master because I want my slides to come first. So, I rename the Slide Masters.
Select the first (and largest) slide of the first Slide Master.
Go to the Slide Master ribbon.
Click on Rename.
The Rename dialog will appear.
Enter a new name for Slide Master (For example, Lesson Plan Slides).
Press Enter or Click on Rename.
Select the first (and largest) slide of the second Slide Master.
I usually rename the second slide master as Standard Slides.
Now, when you insert a new slide in a blank presentation you will see a list of nine layouts under the title of Lesson Plans Slides and another nine layouts under the title Standard Slides.
Both your Slide Masters will be visible in the slide pane on the left-hand side of the screen. There is a hierarchy to the slide master that is useful to know.
The large slide at the stop of the list represents your slide master. Any editing that is done on this slide will affect all the layouts.
For example, if you place a logo in the top left-hand corner, it will appear on all the slides & layouts in your presentation.
The smaller slides beneath are the different layouts available in the Slide Master. The layouts available include:
Title Slide Layout
Title and Content Layout
Section Header Layout
Two Content Layout
Comparison Layout
Title Only Layout
Blank Layout
Content with Caption Layout
Picture with Caption Layout
Title and Vertical Text Layout
Vertical Title and Text Layout
If you edit one of these layouts, it will only affect this individual layout.
For example, if you place a logo in the top left-hand corner of the title slide layout, your logo will only appear when you insert a new title slide into your presentation.
However, the benefit of having two slide masters is that you can delete a lot of these predesigned layouts and create your own. Insert layouts and placeholders to manage your content.
Inserting Placeholders
Placeholders are what they sound like. They hold the place for your content so that you can easily insert text, graphs, pictures, videos and SmartArt.
You see placeholders every time you start a new PowerPoint presentation. Do these look familiar?
Click to add title Click to add subtitle
Not all layouts and placeholders are useful though. I don’t think I have ever used the placeholder to add a title to my presentations. I have always created my own.

Select the pre-made layouts from the slide pane and delete the ones you don’t want.
Go to the Slide Master ribbon and click on Insert Layout.
Click on Insert Placeholder and select the type of placeholder that you want.
Left-click and hold to draw your placeholder.
This is an example of one of my custom slide layouts.

I inserted a black rectangle at the bottom of the slide before adding a text placeholder.
I deleted the sample text and added the label Slide Title – This is the place where I can describe the activity or add page references.
I inserted a white rectangle, which is my information banner.
The banner contains two text placeholders where I can add useful language or conversation prompts.
The banner also contains three picture placeholders with the label icon. – This is the place where I insert instructional icons that tell my students whether they are working in pairs or group, whether the activity is timed or whether they can use their devices to help them.
Some slides are blank and some slides like this have a content placeholder that allows you to insert images, videos, graphs and SmartArt.

However, there are several placeholders to choose from. The three placeholders that I use the most are:
The Content Placeholder
Think of this as the universal placeholder. Six different icons appear in the middle of the placeholder and click on the relevant icon to add that specific content.
For example, click on the bottom right icon to insert video files.
The Text Placeholder
The text placeholder is different from a text box. If you insert a text box on a slide master, it will always appear on the slide and in your presentation. If you insert a text placeholder, it will only appear in your presentation when you type in your text during edit mode.
The Picture Placeholder
This placeholder is for images. Some people don’t like it because not all of the image will be visible if your image is larger than the placeholder. However, it only takes a click to change this.
During edit mode click on your image placeholder and insert an image.
Go to the format ribbon and select the arrow beneath crop to show the crop menu.
Select fit, which is at the bottom of the list, and your image will be resized with fit within the borders of the image placeholder.
Note: When you copy and paste images on a slide that contains a picture placeholder, the image will automatically be inserted into the placeholders. You only be able to paste an image outside an image placeholder if the placeholders have been deleted or filled.
Other Placeholder include:
The Chart Placeholder, The Table Placeholder, The SmartArt Placeholder, The Media Placeholder, and The Online Image Placeholder
Saving Your Template
Once you have finished designing your Slide Master you can exit out of the Slide Master view by clicking on Close Master View on the Slide Master ribbon.
Then you can save your template.
Note: The first slide of your template will be shown as the preview. Save your template after you have finished designing your first slide.
Go to File
Click on Save As
The Save As dialog will open.
Change the file type from PowerPoint Presentation (.ppt / .pptx) to PowerPoint Template (.pot / .potx)
The file location to automatically change to a folder called Custom Office Templates, which can be found in your Documents Folder.
Hint: Beneath where you type in your filename there is a drop down list of all available file types. Click on that list and select PowerPoint Template.
It’s important to save your template in the Custom Office Templates location because it means you will be able to open your templates whenever open PowerPoint.
When you open PowerPoint you will see a list of templates you can use. Above those templates you will see two words – Featured and Personal.
Click on Personal and select any of the custom templates you have previously designed.
I hope you have found this introduction to the Slide Master View useful, and I hope your templates save you time and cut down on your lesson preparation. If you have any questions about the Slide Master View, please leave a comment and I’ll answer you if I can.
Alternatively, you can send me a message by visiting the contact page, leaving me a message on my Facebook page or by following me on Twitter.
Thanks for reading and take care!
10 PowerPoint tips for teachers is an article I wrote back in June 2015 and it included some tips for designing PowerPoints as well as tips to help you deliver your presentation. Using the pointer, turning the screen to black and zooming in to help your students see.

10 more PowerPoint tips for teachers is an article I wrote back in April 2016 and it included some time-saving tips, as well as introduction to some useful features. Using the animation painter, reusing slides and using the magnifier to make it easier for your students see the screen.
Special thanks to Owen Kozlowski for his suggestion of using instructional icons.
All images were designed and compiled with Microsoft® PowerPoint® 2016 All images are for educational purposes only.
Microsoft® PowerPoint® 2016 is a copyrighted product of the Microsoft® corporation.


Comments