
Random Choices – A PowerPoint Randomizer
- admeurotrucksimula
- Jul 23, 2017
- 6 min read
Random Choices is a fun way to present prompts, words and images to your class.
Prompts are useful because they provide a framework or context for the situation. They can be developed into improvisation activities. Words can be used to review grammar and vocabulary and images can easily provide the inspiration for students to create their own stories.
In April of 2016, I previously designed a version of Random Choices in Excel. This in turn was an update of an earlier version in Excel. The Excel file could be inserted into PowerPoint, but at the time I didn’t know how I could create a randomizer in PowerPoint only. Then, the other day I was thinking back to some of my earlier projects and I realized that a randomizer could use the same principle as the PowerPoint spinning wheel.
Watch the video demo below to see how Random Choices works in PowerPoint.
Watch the video tutorial to see how to edit and use the template. The video run-time is 1 minutes and 49 seconds.
Download the Template
Click on the image (above) or follow the link (below) to download the template.
Download the Random Choices PowerPoint template
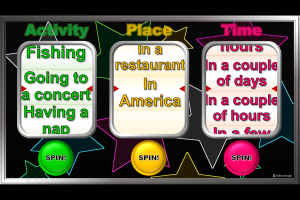
The template consists of a single slide. Beneath the slide there are three topic lists and each topic list contains space for 10 words. During the slideshow, the words appear in the three windows when you click on the spin buttons.
Editing & Using the Template

Screenshot of the Random Choices template
Download and open the Random Choices PowerPoint template
Choose 3 topics
Activities, Places, Times
Nouns, verbs and adverbs
Subject, Verbs, Objects
Words, Phrases, Sentences
Scroll down to below the slide and you will see three lists of 10 words.
Double click on the text to highlight.
Write your new word.
Complete this procedure until all the words have been replaced.
Go to the slideshow ribbon and start the presentation.
Click on each of the spin buttons to make the text rotate in the view windows.
Click on each of the spin buttons again to stop the text rotating in the view windows.
The selected word is indicated by the two red triangles on the side of the window frame.
The students should use the selected word or prompt.
If no word is indicated and there is only a question mark, this indicates that the students can choose one of their own words at random.
If you wish to spin the words again, click on the spin button again.
Repeat as many times as you wish.
Ways to use a randomizer in class
Vocabulary Review
Using the Random Choices as a way to review vocabulary that has been recorded over the duration of the course. Add 10 words, 10 phrases, and 10 sentences to the text boxes and ask the students to recall their meanings.
Starting Questions
Choose 3 topics and write down several ‘starting questions’ for each topic.
For example, if the topic was free time an example question may be:
What did you do on the weekend?
These kinds of prompts can help students speak English from the very beginning of the class. It also serves as a review if you have chosen questions that appeared throughout the course.
Story Prompts
Add names, locations and situations to the words list.
Spin the words and assign a combination of prompts to a student or group and ask them to write a short story based on the words they were given.
Role-play Situations
Add names, locations and situations to the words list.
Spin the words to get a random combination, but instead of writing a short story, ask a group of students to work together to create a role-play based around the words they given. The role-play can then be performed after the students have had enough thinking and practice time.
Gestures
Add verbs, nouns and adverbs to the words list.
Divide the students into groups of 4-5 students. Ask one student from each group to look at the random word combination. The students then return to their groups and act out the words/situation with gestures.
Alternatively, ask one students from each group to come to the front of the class with their backs to the projector screen. The other members of their groups have to act out the words/situation using gestures.
The group that guesses the situation first wins a point.
Whisper Chains
This activity is useful for practicing grammar structures.
Add subject, conjugated verb and object to the words list.
Divide the students into 2 or 4 groups. Each group forms a line with student at the front (closest to the board) holding a piece of chalk or a marker.
Show a random combination of words to the students at the back of the lines. They think of a sentence and whisper it to the person in front of them, who in turn whispers it to the person in front of them until it reaches the person at the front of the line.
The person at the front of the line then runs to the board and writes down the sentence. The first group with a grammatically correct sentence wins a point.
Customizing the template
You may wish to customize the template to suit the theme of the subject you are teaching or to reflect your students’ interests. Or you may wish that the Random Choices were pictures instead of words. Continue reading if you want to find out how to make these customizations.
Changing the Background

Follow these steps to change the background image.
Right-click on the background image.
Select format picture from the menu that appears.
The format window pane will appear on the right-hand side of the screen.
Click on the fill & line icon. (It looks like a small paint can)
From the fill menu, choose picture or texture fill.
Click on ‘file…‘ to insert a picture from your computer.
Locate your image and click insert.
Your own image will now appear as the background to the ‘Random Choices’ template.
Changing the text to images

If you prefer to use images as prompts instead of words, follow these steps.
Left-click on one of the word group lists.
Left-click again on an individual word to select it.
Double click on the text to select it and press delete.
Right-click on the blank box and select format shape from the menu.
From the fill menu, choose picture or texture fill.
Click on ‘file…‘ to insert a picture from your computer.
Locate your image and click insert.
Your image will now appear within the box.
Repeat this procedure for all boxes within each word list group.
Adding more words
Adding more words to the list is possible, but it is involves doing several things. Follow the tips below.
Click on the word list you want to increase.
Go to the format ribbon.
Click on group from the arrange section and select ungroup.
Select the numbers of words you want to copy and press CTRL+C.
Press CTRL+V to paste the words.
Move the words so they appear connected to the list.
Select all the words.
Go to the format ribbon.
Click on group from the arrange section and select group.
Go to the home ribbon, click on select from the editing section and open the selection pane.
The new group appears at the top of the list. Move the group down so it appears with the other word lists below the three markers.
Go to the animation ribbon and click on the animation pane in the advanced animation section.
Click on the word group and choose the fly in animation from the drop-down list.
Click on the animation options and make sure the direction is set to down.
Click on the new animation in the animation pane.
Click on trigger in the advanced animation section and select on click of and choose the correct spin button.
Move the animation up in the animation pane so that it is the first animation for the spin button.
Click on the arrow next to the animation and choose timing from the menu that appears.
The timing dialog will open.
Change the duration to 0.1 seconds.
Change repeat to until next click.
Click OK.
If you have any questions about customizing the template, don’t hesitate to contact tekhnologic.
We’d also like to hear from you if you have any suggestions for using the Random Choices template.
Please leave a comment if you have any ideas you would like to share or if you have any questions about the template.
Thanks for reading and take care!
You may also like to read:

Bringing an element of randomness into the classroom can really challenge students. There are many apps that act as random generators, but have you tried using Excel to create a randomizer of your own?
Spinning Whee
ls are a great way of introducing an element of randomness into the classroom. I created a spinning wheel in PowerPoint. There are some advantages to this version. It can be inserted into any presentation by copying and pasting the slide and it doesn’t require an internet connection.
I enjoy using drama, improvisation and role-plays in the classroom, but how could we use PowerPoint to select a random situation or scenario? The idea behind the template was to transition to a random slide when you click on the button in the lower right-hand corner of the slide.
The Random Choices template was designed with Microsoft PowerPoint 2016. Animations and sounds may differ when opened in other presentation software.
Microsoft® Office® is a copyrighted product of the Microsoft® corporation.
All media that accompanies Random Choices is for educational purposes only.


Comments